The Art of Backlighting Waves
The fundamental principle to good photography is understanding light; where it’s coming from, and where it is going. In this article we are going to explore the art of backlighting when it comes to moving masses of water and waves.
If you’re on an east facing coast, morning is going to be your time to get creative with back lit lighting. For western facing coasts, you don’t have to get up as early, as it’s the evening that’s going to provide these kind of shooting conditions. Light bounces and reflects off surfaces with greater densities, so when it shines down into or across water, it creates all kinds of refractions, sending light in all sorts of weird and wonderful directions, creating a myriad of beautiful colours. To utilize this natural phenomena, it comes down to positioning - where you are in the water in relation to the wave and the sun. The position the sun rises throughout the year is always moving, and so is the place in which a wave breaks. The variables to consider can be swell direction and size, tides and winds on the day.
Having to align so many conditions and elements can be difficult, but that’s one of the joys and burdens of wave photography. Getting a really top notch shot is hard, and if you miss an opportunity, it might not come back around for awhile, if ever. The key to nailing an epic backlit wave shot is to align yourself with the wave and light source (sun) as best as possible, so that the wave breaks through the light, illuminating the pitching lip, face of the wave and back of the wave as it breaks past you.
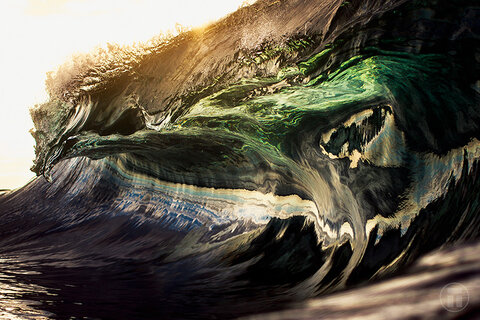
A favourite of mine shot on the South Coast, NSW, Australia. On a running tide, reefs like this can create all kinds of crazy shapes, all the more angles for light to bounce off!
Canon 5D Mark 2 and Canon 16-35mm f/2.8 at 1/1000, f/5.6, ISO 160.
Spend Time in the Water
Shooting backlit waves may sound easy enough, but it’s a multitasking mastery of sorts that really only comes with good old experience and practice! To progress, get out and swim around as much as you can with your camera and housing, so that changing settings on the fly and keeping yourself composed becomes second nature. The more things that become second nature to you, the more capacity you will develop when it comes to capturing that finite moment. While you’re at it, be mindful of how the changing light direction affects the waves.
Practice is going to teach you the fundamentals about handling the wave environment. Honestly, the biggest advantage I have in wave photography is simply being comfortable amongst the waves. I’ve spent enough time amongst them that all the stressful elements that comes with shooting waves like tidal surges, undertows, impact zones and hold downs, whitewash and wipeouts, creatures and impending crests, don’t stress me out as much because of the experience I’ve had with them. Thus I’m able to focus more on positioning myself to get the shot. It’s all about getting in the right spot - having the correct settings and pressing the shutter is the easy part.

A stormy morning (which often provides amazing lighting) shot when the sun just popped out for a minute or so, illuminating the lip of the wave with the turquoise and green colours. Shot on the south coast, NSW, Australia.
Canon 7D Mark 2 and Canon 8-15mm f/4 at 1/1000, f/4.5, ISO 640.
Exposure for Backlit Waves
With a backlit subject, you can generally approach the shot in one of two ways. You can expose for the shadows, creating a very high key effect, or expose for the highlights, creating a silhouetted sculpture of the wave. Both have equally epic and very different qualities to them. I’d encourage mixing both of them up by experimenting with your shutter speed, aperture and ISO.
Time of day is obviously important as well. For me on the southeast coast of Australia, early morning is going to be the opportune time to get out and get creative with backlighting, and depending on the time of year, that low lying light doesn’t last long! (Tongue twister right there..)

An open ocean bombie that the sun was rising directly behind - a recipe for epic shots! While beautiful, it was a nightmare to stay in the right position with the huge amount of water swirling and moving around, and no real defined sweet spot or channel to sit in. Shot on the South Coast, NSW.
Canon 5D Mark 2 and Canon 16-35mm f/2.8 at 1/1000, f/5.6, ISO 320.

Canon 5D Mark 4 and the 70-200mm f/2.8 at 1/1600, f/6.3 and ISO 100.

A combination of back lighting and in-camera shutter blur to create this effect. Something that a lot of practice will help you achieve, as you really need to be comfortable in the water enough to give your full focus on the camera controls.
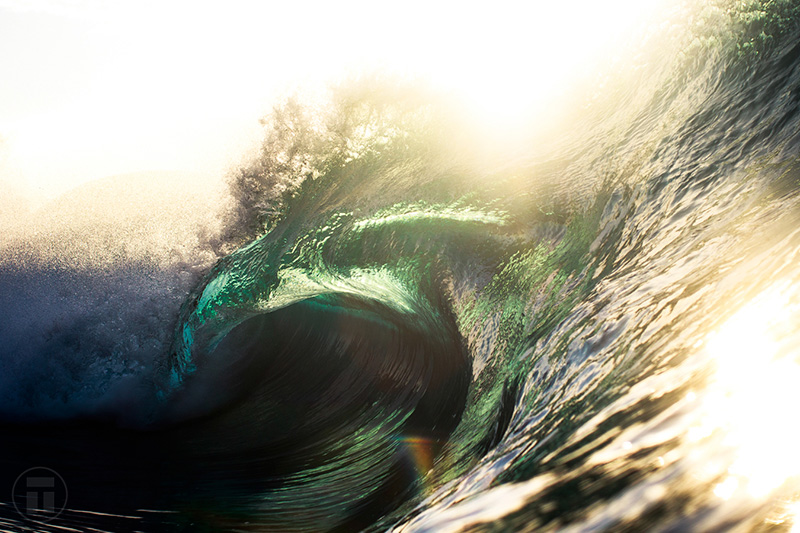
Canon 7D Mark 2 and 50mm f/1.2 at 1/1000, f/5.6, ISO 100.
RECOMMENDED ARTICLES
SUPPORT THE UNDERWATER PHOTOGRAPHY GUIDE:
The Best Service & Prices on u/w Photo Gear
 Visit Bluewater Photo & Video for all your underwater photography and video gear. Click, or call the team at (310) 633-5052 for expert advice!
The Best Pricing, Service & Expert Advice to Book your Dive Trips
 Bluewater Travel is your full-service scuba travel agency. Let our expert advisers plan and book your next dive vacation. Run by divers, for divers.


