Aperture, F-stops and Depth of Field Underwater
The aperture of your lens is an opening that can be made smaller or larger. Each lens will have a largest aperture, e.g. F2.8, which lets in the most amount of light. The size of an aperture is referred to as an F-stop. Here is a slightly more techincal explanation. As the aperture is made smaller, the F-stop increases in number (e.g. F8, F11, F16) and the amount of light that enters through the lens decreases. So remember - a small F-stop (e.g. - 2.8) is a large aperture. As the F-stop number gets larger (e.g. – F22), the aperture gets smaller.
Decreasing the aperture by one "stop" will let in 50% less light. Let's look at the apertures that have a 1-stop difference, going from a large aperture to a small aperture.
F2.8 F4 F5.6 F8 F11 F16 F22 F32
Making the aperture smaller, e.g. going from F2.8 to F4, is called "stopping down," or closing the aperture. F4 is one stop away from F2.8, so we "stopped down 1 stop."
Defining depth of field
Depth of field (DOF) is an important concept. The depth of field is the area of a photo that is in focus. Areas outside of the DOF are blurry, with the blurriness increasing the further away they are. The sharpest area of the photo is the location your camera focused on. This area, parallel to your camera lens, is called the focal plane. The depth of field extends in front of this point, towards the camera, and behind this point.
Look at the first two photos below, in the last section on this page, and you can clearly see the areas that are in focus, which lie within the depth of field. In nature photography, people are often told that the depth of field lies 1/3 in front of the focal point (closer to the camera), and 2/3 behind the focal point. This is sometimes true, but when doing macro photography, the DOF lies equally in front and behind the focal point.
Depth of field and compact cameras
Compact cameras, with their small sensors, will have more depth of field than a dSLR. This means it will be more difficult to get a blurred background. For best results at getting a blurred background, shoot wide open at F2.8, zoom all the way out (so your lens is "telephoto", not "wide"), and get close to the subject. The examples in the photos below are from a dSLR. The smallest aperture on a compact is usually F8. This should give you plenty of depth of field.
Changing the aperture does the following
Affects ambient light and strobe light. The smaller the aperture, the less light that enters the lens from all sources.
Smaller apertures (e.g. F22) result in larger depth of fields. In general, closing the aperture by 1 stop, e.g. changing from F11 to F16, will give you approximately 40% more depth of field.
Smaller apertures on a dSLR, around F20 & greater, will result in loss of sharpness (Diffraction) at 100% magnification.
Aperture controls the bokeh, or blur, of the background. A large aperture such as F2.8 will heavily blur the background. A very small aperture will keep the background almost in focus.
Aperture will effect the performance of lens, especially zoom lens and non-prime lenses. Lenses often perform best when stopped down 1 or 2 stops. A quick rule of thumb, known as "F8 and be there", says shoot at F8 when you want maximum sharpness and don't care about depth of field or the background.
Using too small an aperture will prevent your underwater strobes from lighting the subject if they are not close enough, due to strobe falloff. It’s very common for beginners to try to shoot something 2ft away with an aperture of F22. Unless you have a very powerful strobe, the subject will be underexposed. If you are shooting a close-up at F22, and then you want to shoot something further away, you have to quickly “dial down” your aperture.
Changes affecting Depth of Field, and other facts
-
As I stated above, making your aperture one stop smaller will give you 40% more depth of field. Making your aperture two stops smaller (e.g. changing from F8 to 16) will give you 96% more depth of field.
-
Getting closer to your subject will give you less depth of field
-
Backing away from your subject gives you more depth of field. Backing up, snapping a photo, and cropping is a trick used to get more depth of field for a subject, especially when you don't need a large print.
-
The smaller the aperture, the less defined the boundary between the "in focus" area and the "Blurred" area.
Diffraction
-
Light waves traveling through the lens aperture get dispersed when the aperture is very small. This causes a loss of sharpness at small apertures, known as diffraction. Stated another way, diffraction is an effect that happens when light passes through a very small opening. The smaller the opening, the more this effect results in the image getting blurred.
-
At some point, usually around F29-F32 on a cropped sensor dSLR, increase of depth of field does not compensate much for the loss of sharpness.
-
Diffraction happens much earlier on a compact point and shoot camera, because of their small sensors. This is why the smallest aperture is usually F8.
-
The effects of diffraction are normally not noticed when posting photos "on the web", but you will notice the difference at 100% magnification. Please view the results of my diffraction tests in my Nikon 105mm lens review. I've also tested diffraction at 1:1 magnification.
Choosing your aperture for macro shots
When taking a photo underwater, I usually think about three things when choosing an aperture:
-
How much depth of field do I want for this shot?
-
Do I want the background blurred or in focus?
-
Am I worried about losing a little image sharpness to diffraction?
-
Am I shooting near 1:1 or supermacro? If so, your depth of field is tiny, so use larger apertures such as F8 at your own risk, even for flat subjects parallel to your camea.
Continue reading about...
DOF Examples Lens Basics Image Sharpness
Shutter Speed ISO Pixels, Sensors & Dynamic Range
Fisheye Lenses RAW vs JPEG Histograms
Understanding Depth Of Field (DOF) and Bokeh
Depth of field is related to the aperture of a lens used, the focal length of a lens, and how close you are to the subject. WA lens have large DOFs, while macro photos taken at 1:1 magnification will have very small depths of field. Also, note the difference in bokeh, or background blur in the following photos.

Goby at Catalina island, taken at F4. Only the eyes are in focus, and the backgroun is blurred very smoothly.

Ronquil, F7.1, California. Heavy blur in the background. By changing from F4 to F7, we get the mouth and eyes in focus.

Mantis shrimp, Anilao at F8. The entire front is in focus, with the background nicely blurred.

Goby taken at F11, Anilao. F11 got both the eyes and mouth in focus, and a little of the next. Still, the entire background is blurred. This is partially because I am so close to the goby. The larger this ratio is - background-to-subject distance / subject-to-camera distance, the more blurred the background will be.

Vase Tunicate, F18. 60mm lens, Raja Ampat. I wanted to get the entire vase in focus, so I used a smaller aperture, but I didn't want diffraction to ruin the tiny details. As a byproduct, the colored background is not blurred, but is still a little out of focus.

Pillow starfish shrimp, Maui. 60mm lens. F18 gave a good enough depth of field for this shot. The shrimp lives under the starfish.

Nudibranchs, F25, Anilao. The rhinophores and the gills are in focus, but now the background is distracting. That's what happens with a small aperture.

Starfish at Catalina, california. F29. There is a large depth of field, and the background is also very prominent. In this photo I find the background distracting. I use this aperture only when I need all of that depth of field.

100% crop of the photo above, at the point of focus. As you can see, diffraction is causing it to loose a little bit of sharpness.
Depth of Field example - Nudibranchs
If you are using a dSLR or mirrorless camera to photograph the front of a nudibranch, you have 3 choices when choosing your f-stop:
- Choose a large aperture between F4 and F9 to blur the gills in the background
- Choose a medium aperture between F10 and F16 to slightly blur the rear of the nudibranch. This is often my choice, as I find that it results in the most pleasing photo. The focus is on the front of the animal, but you can still recognize the background.
- Stop down to a small aperture between F18 and F29 to get as much of the subject in focus as possible. This is useful for natural history or field id photos.
Changing the depth of field in Photoshop
Read the article on Using photoshop and the Gaussian Blur
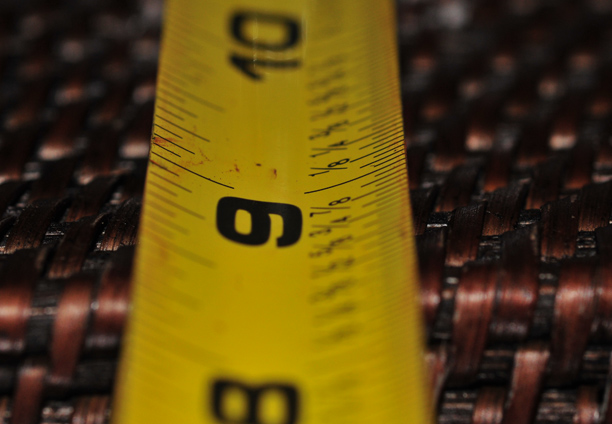
Depth of field test on a Nikon 60mm lens
This test is not designed to show you a precise measurement of the depth of field, since the ruler is actually at an angle. It simply shows you how the depth of field increases. Notice how the boundary between the in-focus area and the out-of-focus area becomes less defined as the aperture gets smaller. The test is done fairly close to 1:1 magnification.

60mm lens at F4

F5.6

F8

F11

F16

F22

F32

F40
Further Reading
RECOMMENDED ARTICLES
SUPPORT THE UNDERWATER PHOTOGRAPHY GUIDE:
The Best Service & Prices on u/w Photo Gear
 Visit Bluewater Photo & Video for all your underwater photography and video gear. Click, or call the team at (310) 633-5052 for expert advice!
The Best Pricing, Service & Expert Advice to Book your Dive Trips
 Bluewater Travel is your full-service scuba travel agency. Let our expert advisers plan and book your next dive vacation. Run by divers, for divers.


